Recommended picks
This article may include affiliate links. If you click and buy, we may earn a commission at no extra cost to you.

4.6 rating 13,100 reviews
Check on Amazon
4.6 rating 89,300 reviews
Check on Amazon
4.6 rating 22,600 reviews
Check on AmazonQuick answer
A practical, device-safe after-use cleaning routine that explains what to wash, what not to submerge, how to disinfect, and how to dry and store nebulizer parts correctly.
Key takeaways
- What parts of a nebulizer should be cleaned after use?
- Can you wash nebulizer parts with soap and water?
- How often should a nebulizer be disinfected?
- Can you boil nebulizer parts or put them in the dishwasher?
How to Clean a Nebulizer After Each Use: A Safe Step-by-Step Guide
Keep treatments effective and reduce contamination risk with simple cleaning, drying, and storage habits for home users and caregivers.
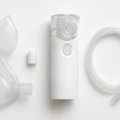
If you use a nebulizer at home, a quick cleaning routine after every treatment can help keep the device working properly and reduce the chance of buildup in the parts that touch medication and mist. The key is to clean the right components, use the method your device manual approves, and let everything dry fully before storage.
Why cleaning after each use matters
Cleaning your nebulizer after each use is one of the simplest ways to support safe, consistent treatments. Moisture and medication residue can create a place for bacteria, mold, and mineral buildup to collect if parts are left dirty or damp.
- Helps prevent bacterial and mold growth
- Reduces the risk of respiratory infection
- Keeps medication delivery consistent
- Extends the life of the nebulizer components
For the best results, think of cleaning as a routine part of treatment, not an optional extra.
What to clean right away
After each use, focus on the parts that directly contact medication or aerosol mist. These are the components most likely to collect residue and moisture.
- Mouthpiece or mask
- Medication cup or nebulizer chamber
- T-piece, if included
- Any removable parts that contact medication or mist
Important: Do not wash the compressor or tubing unless the manufacturer specifically says it is safe. Those parts are often not meant to be submerged or rinsed.
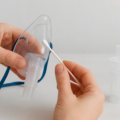
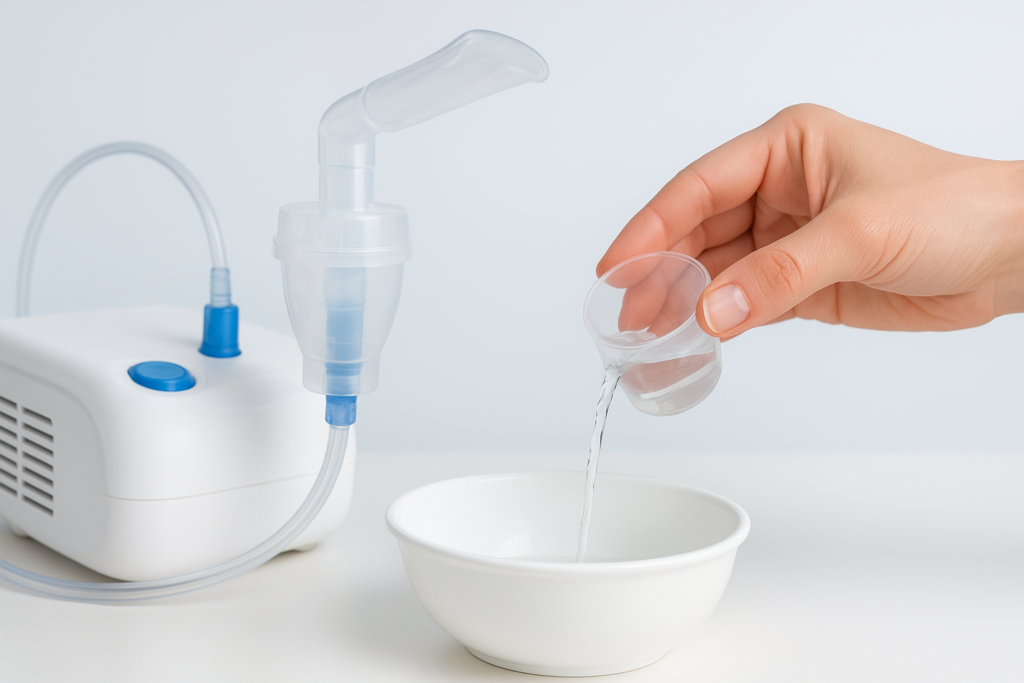
Step-by-step cleaning process
- Wash your hands before handling the nebulizer parts.
- Disassemble the nebulizer according to the user manual.
- Rinse removable parts with warm water.
- Wash the parts with mild dish soap and clean water.
- Rinse thoroughly to remove all soap residue.
- Shake off excess water gently.
Use a clean sink or basin, and avoid setting parts on dirty counters. If your device manual gives a different cleaning method, follow that instruction instead of a general routine.
How to disinfect safely
Cleaning and disinfecting are not the same thing. Cleaning removes visible residue, while disinfecting helps reduce germs on parts that are safe to disinfect. Not every nebulizer component can be disinfected the same way.
Use only the disinfection method recommended by the manufacturer. Depending on the device, approved options may include a vinegar solution, boiling, or a manufacturer-approved disinfectant product.
- Never disinfect parts that are not heat-safe or water-safe
- Follow exact soak times and dilution instructions
- Do not assume one method is safe for all nebulizers
- If the manual is unclear, contact the manufacturer or a respiratory therapist
If you are caring for a child, an older adult, or someone with a weakened immune system, it is especially important to confirm the correct method for that specific device.
Drying and storage best practices
Drying is just as important as washing. Even a clean nebulizer can become contaminated again if it is stored while still damp.
- Air-dry parts on a clean paper towel or drying rack
- Avoid wiping with cloth towels that can leave lint or germs
- Store fully dry parts in a clean, covered container
- Keep the nebulizer away from dust, moisture, and bathroom humidity
If possible, let parts dry in a clean area with good airflow. Make sure every piece is completely dry before reassembly or storage.
What not to do
A few common shortcuts can damage the device or increase contamination risk.
- Do not reuse dirty rinse water
- Do not skip drying before storage
- Do not submerge the compressor
- Do not use harsh chemicals unless approved
- Do not share nebulizer parts between users
Also avoid guessing about care instructions. If a part is not clearly labeled as washable, dishwasher-safe, or heat-safe, treat it as delicate until the manual says otherwise.
How often to replace nebulizer parts
Even with good cleaning, nebulizer parts wear out over time. Replacement schedules vary by device and usage, so the manual should always come first.
- Replace masks, mouthpieces, and cups based on wear or manufacturer guidance
- Check tubing for cracks, moisture, or discoloration
- Replace filters as directed by the device manual
- Watch for reduced mist output or unusual odors
If a part looks cloudy, sticky, warped, or damaged, replacement is often safer than trying to restore it.
Troubleshooting common cleaning problems
If your nebulizer still does not look or smell right after cleaning, the issue may be residue, moisture, or wear.
- Cloudy residue may mean soap or mineral buildup
- Sticky parts may need a deeper clean or replacement
- Persistent odor can signal mold or trapped moisture
- Poor misting may indicate clogged parts or worn components
When in doubt, stop using the affected part and check the manufacturer’s guidance. If symptoms are worsening, or if there is fever or another sign of infection, seek medical advice promptly.
Quick daily nebulizer care checklist
- Wash hands before handling parts
- Clean removable parts after each use
- Rinse away all soap residue
- Air-dry completely
- Store in a clean, dry place
- Inspect for cracks, cloudiness, odor, or buildup
FAQ
Do I need to clean my nebulizer after every use?
Yes. At minimum, the parts that contact medication or mist should be cleaned after each use to reduce contamination and keep the device working properly.
Can I just rinse nebulizer parts with water?
Rinsing alone is usually not enough. Most manufacturers recommend washing with mild soap and water, then disinfecting on the schedule they provide.
Can nebulizer parts go in the dishwasher?
Only if the manufacturer specifically says they are dishwasher-safe. Many parts can warp or be damaged by high heat.
How do I dry nebulizer parts safely?
Let them air-dry completely on a clean surface or drying rack. Avoid towels that can transfer lint or germs.
Should I clean the tubing too?
Usually tubing is not washed unless the manufacturer says it is safe. If it gets wet, contaminated, or moldy, it may need replacement.
Related reading
Need a simple routine you can follow every day?
Read our full nebulizer cleaning guide and save the maintenance checklist for quick reference.
Comparison snapshot

A Simple Technique People Use Before Bed
A short routine designed to help your body relax and unwind naturally.
- ✔ Easy to learn and takes only a few minutes
- ✔ No equipment or supplements required
- ✔ Popular among people struggling to relax at night
| Product | Rating | Reviews | Availability |
|---|---|---|---|
| Men's Charged Surge 4 Sneaker | 4.6 | 13,100 | Available from Amazon |
| Men's 608 V5 Casual Comfort Cross Trainer | 4.6 | 89,300 | Available from Amazon |
| Men's Charged Assert 10 Shoes | 4.6 | 22,600 | Available from Amazon |
| Men's KnitFlex Breeze Mesh Sneakers Oxfords Lace-Up Lightweight Casual Walking Shoes | 4.6 | 14,100 | Available from Amazon |
| Men's Cankton Steel Toe Construction Shoe – Electrical Hazard Rated, Memory Foam | 4.4 | 27,200 | Available from Amazon |
Pros and cons
Pros
- Clearer shortlist for how to clean nebulizer after use.
- Helps compare trade-offs before buying.
- Includes editorial review checkpoints.
Cons
- Pricing and availability should be verified on Amazon.
- Best choice depends on your use case.
- Product listings may change after publication.
Frequently asked questions
Do I need to clean my nebulizer after every use?
Yes. At minimum, the parts that contact medication or mist should be cleaned after each use to reduce contamination and keep the device working properly.
Can I just rinse nebulizer parts with water?
Rinsing alone is usually not enough. Most manufacturers recommend washing with mild soap and water, then disinfecting on the schedule they provide.
Can nebulizer parts go in the dishwasher?
Only if the manufacturer specifically says they are dishwasher-safe. Many parts can warp or be damaged by high heat.
How do I dry nebulizer parts safely?
Let them air-dry completely on a clean surface or drying rack. Avoid towels that can transfer lint or germs.
Should I clean the tubing too?
Usually tubing is not washed unless the manufacturer says it is safe. If it gets wet, contaminated, or moldy, it may need replacement.
How to choose how to clean nebulizer after use
- Define your requirements
- Compare credible options
- Check current availability and terms
- Choose the best fit for your budget